Devlog. Part 4 - Vehicle Controller
Vehicles, and how to tune them
In the latest EdenSpark update, we added the ability to create vehicles! A vehicle consists of wheels and an engine, so today I'll briefly cover how they work and how to tune them.
VehicleController in action
Throughout this devblog I will use absolutely gorgeous 3D models from kenney.nl. If you like it, go check it out - it's free to use!
Wheels are a lie
Did you know that in most physics engines, car wheels aren't actually made out of cylinders? Every wheel looks like a cylinder, so it seems obvious that its shape should be a cylinder too. But if you actually do that - attach spinning cylinders to a car - you'll most likely end up with something you wouldn't like.
The main problem with physics in games is that it sometimes becomes unstable. Objects can pass through each other, they could jitter dangerously, a lot of collisions can tank performance, and if you're careless, the whole scene can flat-out explode. You've probably seen this in games: an object gets stuck in the ground, then launches into the sky. In general, a more complex scene has a higher chance of falling apart. For that reason, if you can make your object simpler, you should. Use simple, convex shapes, use as few joints as possible, don't let physics handle complex processes you could instead do with simple code-driven impulses or good animations. You should always do everything you can to keep the physics computation stable.
If you make wheels out of cylinders, they might look fairly stable while standing still. But once the car starts moving, that cylinder could start spinning fast - and if it does, it creates a ton of useless contacts with the surface, and might even clip into something by accident, causing the car to jump around. Such a cylinder is also hard to tune - for a serious simulation it's difficult to get clean, tunable control over tire friction and slip.
That's why physics engines build wheels differently. Instead, the car simply hovers above the ground, and it keeps that gap with a raycast, fired straight down from each wheel's position. The wheels themselves are nothing but a pure visual object dangling from the car's body!
This approach seems unintuitive at first, but it massively simplifies the physics simulation and makes its tuning more flexible. First, you can tune a lot of parameters easily - friction, suspension, etc. Second, you have fewer objects in the scene - just the car body. There's no wheel for another object to wedge into. That also means the non-existent wheel will never fall off the car or clip through the floor, which is a huge relief.
Comparison of a Vehicle with spinning cylinder wheels vs raycasted wheels. I haven't been able to tune the cylinder-based Vehicle to avoid getting stuck on even the simplest bumps on the surface.
If you know how to do raycasts yourself, you can even try simulating a simplified wheel on your own! For each wheel, you can apply impulses so it can stay afloat. The code for it would look something like this:
let ray = Ray(wheel.worldPosition, DOWN)

trace(RayCast(ray = ray, maxDistance = HOVER_RAY_LENGTH, $(hit) {
    // gravity compensation
    var impulse = -gravity * vehicleBody.mass * dt

    // suspension spring
    impulse += UP * \
        ((HOVER_RIDE_HEIGHT - hit.distance) * HOVER_SUSPENSION_STRENGTH -
        get_velocity_at(vehicleBody, ray.origin).y * HOVER_SUSPENSION_DAMPING) * dt

    if (driveForward) {
        impulse += FORWARD * HOVER_DRIVE_FORCE * dt
    }

    apply_impulse(vehicleBody, impulse, ray.origin)
}))
This is what a Vehicle with raycasted wheels looks like
All of this, of course, needs to happen inside on_fixed_update(), not on_update(). Attach visual wheel models to the car, and it'll probably be able to drive somewhere.
But if you're after more realistic vehicle behavior, you might want the engine and transmission simulation provided by the VehicleController component.
add_component(VehicleController)
The wheel behavior is already built into VehicleController. In the simplest case, all you need is a single line:
// The most basic vehicle example
// Adds vehicle support for any rigid body
// Adds four default wheels at positions (-1,1), (1,1), (-1,-1), (1,-1)

newVehicle.add_component(VehicleController())
This creates the most basic possible vehicle.
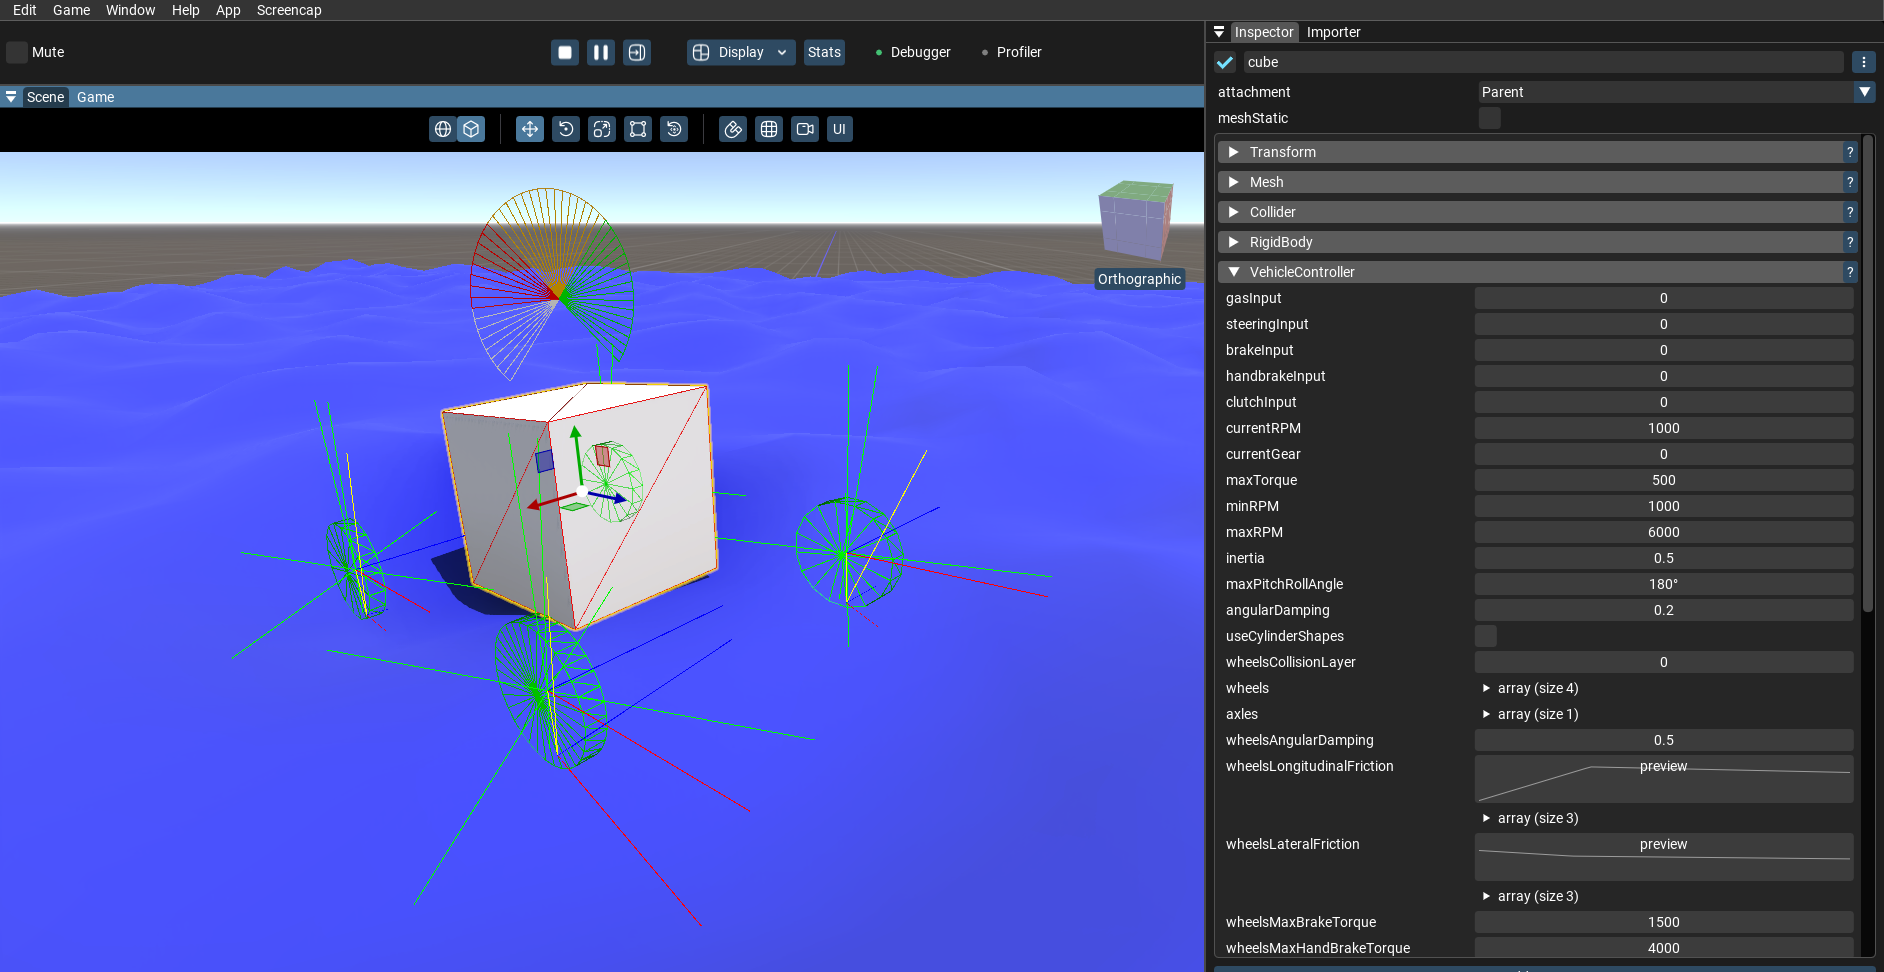
If you want to configure the wheels more flexibly, try this pattern:
// Advanced vehicle example
newVehicle.add_component(new VehicleController())

// Setup wheels
get_component(newVehicle) $(var vc : VehicleController?) {
    vc.wheels[0].position = float3(-1, 0, 1)
    vc.wheels[0].maxSteeringAngle = deg_to_rad(30.)

    vc.wheels[1].position = float3(1, 0, 1)
    vc.wheels[1].maxSteeringAngle = deg_to_rad(30.)

    vc.wheels[2].position = float3(-1, 0, -1)

    vc.wheels[3].position = float3(1, 0, -1)
}

// Set at every frame:
get_component(newVehicle) $(var vc : VehicleController?) {
    vc.gasInput = 1.0 // Full throttle!
    vc.brakeInput = 0.0 // No brakes!
    vc.steeringInput = 0.0 // 1 for the right, -1 for the left
}
A fully configured vehicle with debug drawing
Engine, transmission, differential
I won't pretend I fully understand how the engine and differentials work. Jolt, the physics engine we use, already did that for us. It's based on the article "Car Physics for Games" by Marco Monster. There's also documentation for the VehicleController component itself. At the end of the day, we're just game developers, our job isn't to understand how it works, but to understand how to tune it. And there's clearly plenty to tune here.
The faster the engine runs, the higher its RPM (revolutions per minute). The engine turns a gear inside the transmission, which turns a gear inside the differential, which turns the wheels. Each gear increases torque, but reduces rotation speed.
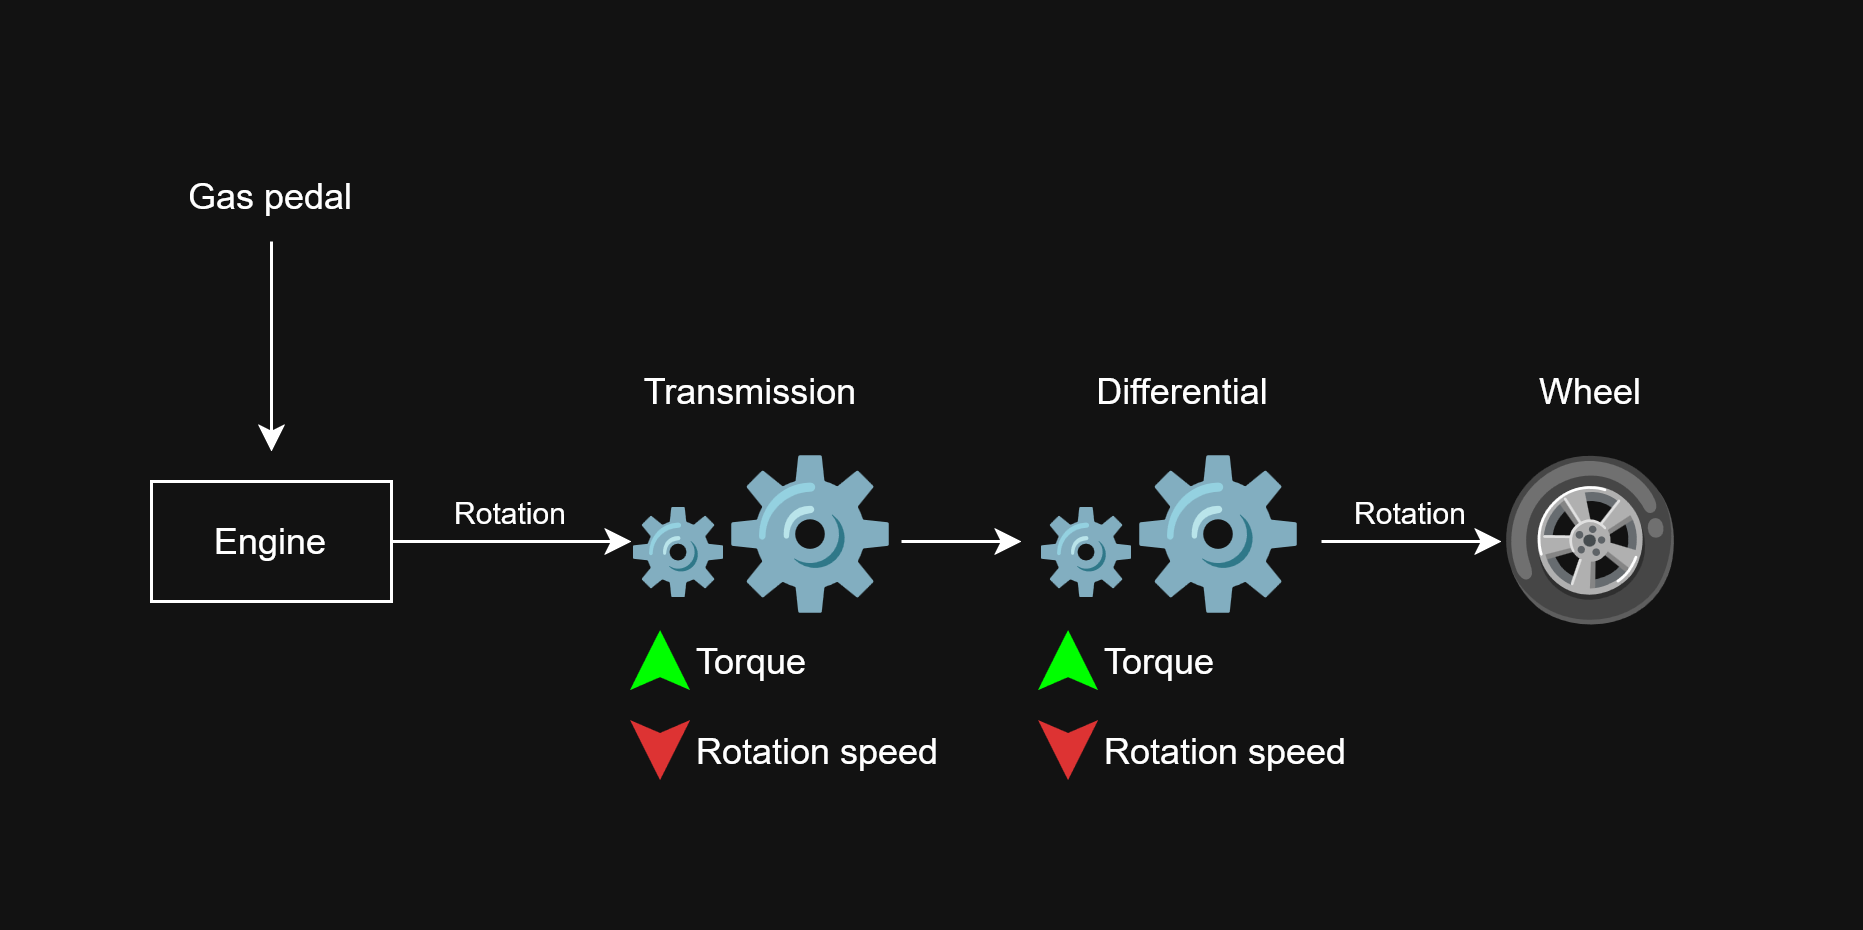
To figure out how much torque reaches the wheel, you multiply the engine's torque by the gear ratios of the transmission and differential. At low gears, this number can be large (could be 7, 10, or even 15), and at high gears it can be 1, or even lower (i.e. the engine spins slower than the wheels).
Usually, gear ratios are taken straight from a real car's spec sheet. But if you want to model a car that doesn't exist, you'll need to understand how to pick those numbers.
To pick gear ratios for your own car: choose the first gear so the car can start moving - even a heavy one, even on a hill. Choose the last gear based on the top speed you want. Then lay out the rest of the gears using geometric progression. Keep roughly the same ratio between neighboring gears, so moving up a gear always drops the RPM by the same percentage.
You can make tuning gear ratios easier for yourself by setting axles.differentialRatio to 1.0. Then all that's left for you to tune is gearRatio, and your car will drive! But if you want something less arcade-y and more precise, VehicleController has plenty more useful settings for you.
A lot of settings
There are plenty more settings, and yes, some of them look a little scary.. But! They're genuinely there to help fine-tune your vehicle. For example, torqueCurve - how torque changes across different RPMs. Or the engine's moment of inertia (inertia). Many of these parameters can be left at their defaults, or pulled straight from the spec sheet of the real car you're trying to simulate. Don't be intimidated by the huge list of parameters though, they're just there for fine-tuning, and most users won’t need to touch them. If you don't know what a setting does... change it and see what happens! Probably nothing good. But, being serious, every setting has its own documentation, so go read it.
My favorite of these settings is maxPitchRollAngle. It keeps the car from tipping over. Set it to 45 degrees, and the car will never fall onto its side. Leave it at the default 180 degrees, and it'll be able to flip and spin through the air if you launch it off a good ramp. Set it to zero, and it won't lean at all, though that could lessen the car's ability to turn.
On the left, maxPitchRollAngle is 180 degrees. On the right, it's 45 degrees. The car on the left easily drops onto its side on a sharp turn.
Also, if your wheels are large or stick out beyond the car's body (like on a Formula 1 car), you'll want the option to give the wheels an extra collider using the useCylinderShapes flag.
Note that when the useCylinderShapes flag becomes true, the wheels stop intersecting with the pavement.
Motorcycle
While wiring up Vehicle support, I noticed Jolt also supports motorcycles. My first thought was - why not add those too?
Turns out it wasn't that hard. Conceptually, a motorcycle differs from a four-wheeled vehicle in one way: it leans sideways in a turn. And that comes down to just one setting - leanMaxAngle, the maximum lean angle of the vehicle. Note that this only works if you enable the motorcycle logic by setting enableMotorcycleLean=true. But, pretty cool, right?
A motorcycle is a two-wheeled vehicle that can lean into turns.
(An attentive reader might notice that Jolt also supports tracked vehicles. Well, I'm not hinting at anything, wouldn't say anything for certain, who knows what the future holds.. wink wink! Stay tuned for updates!)